Snap to Vent by Zigguraut

Brand Spotlight: Snap-to-Vent Dryer Connectors

- posted by Jerica Parker

What is the most frustrating thing about installing your dryer? For me, it’s all the hoses and attachments, and then, getting them to fit in the laundry room without crushing them.

Even more frustrating is how awkward it is to try to lean over your dryer with the hose clamp and screwdriver to install or clean the ventilation hose.

Luckily for you, and for me, Ziggurat Products came up with a solution to our problem. Snap-to-Vent connectors make this job quick and easy!

How the Snap-to-Vent system Works

When pushing your dryer back against the wall, sometimes the hose can be crushed and this prevents necessary ventilation. Both Snap-to-Vent’s products prevent against crushed dryer hoses and are super easy to install.

The best part about Ziggurat Products company is that it’s local, right here in Kaysville, Utah! Check out the Snap-to-Vent 90-Degree and Snap-to-Vent Straight connections on SmithandEdwards.com.

If your Clothes Dryer vents straight to the duct: Straight Connector

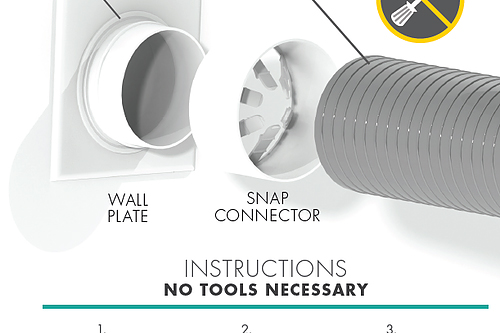
If your dryer duct and wall duct are relatively close together, you will want the Snap-to-Vent Straight design connector. This is an easy connection for installing your dryer, and if you ever need to take it back apart for maintenance or cleaning. Simply pre-connect Snap-to-Vent Straight before you go behind your dryer for installation. Place the snap connector over dryer hose with tines on the inside of the hose. Take the straight and place it so that the tines push against the hose holding the connector tight to the dryer hose. Take the seal ring and either put it around the duct or in the straight and press into the duct until it creates an air tight seal. Easy enough!
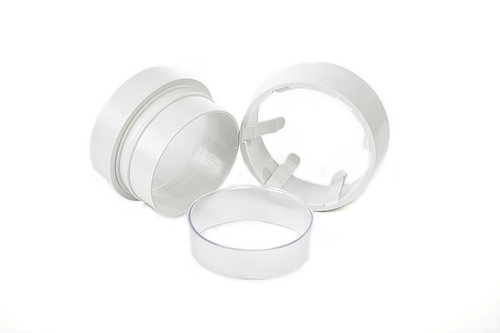
If your Clothes Dryer hose has to vent on another wall, use the 90° Elbow

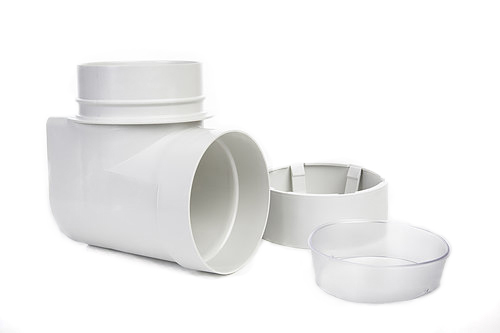
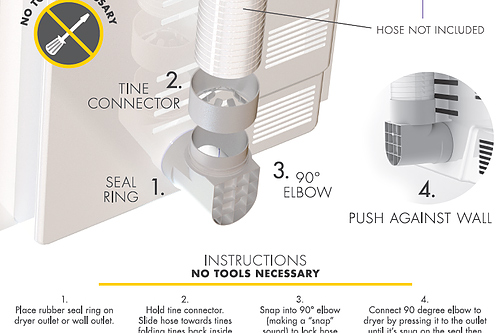
The Snap-to-Vent 90-degree Elbow connection helps to avoid smashing your hose by connecting the hose at a 90-degree angle to your dryer. It comes with easy instructions: Pre-assemble the hose to the snap connector and the snap connector into the 90-degree elbow and snap together. Take the seal ring and pre install onto dryer or wall duct and press the 90 elbow into the dryer duct or wall duct. And voila! The elbow connector can push right up against the wall and still keep your hose protected and working how it should.
Having a clean and clear vent reduces the risk of fires and improves the efficiency of your dryer. With no tools necessary and less time and confusion during installation, how could you not love Snap-to-Vent!

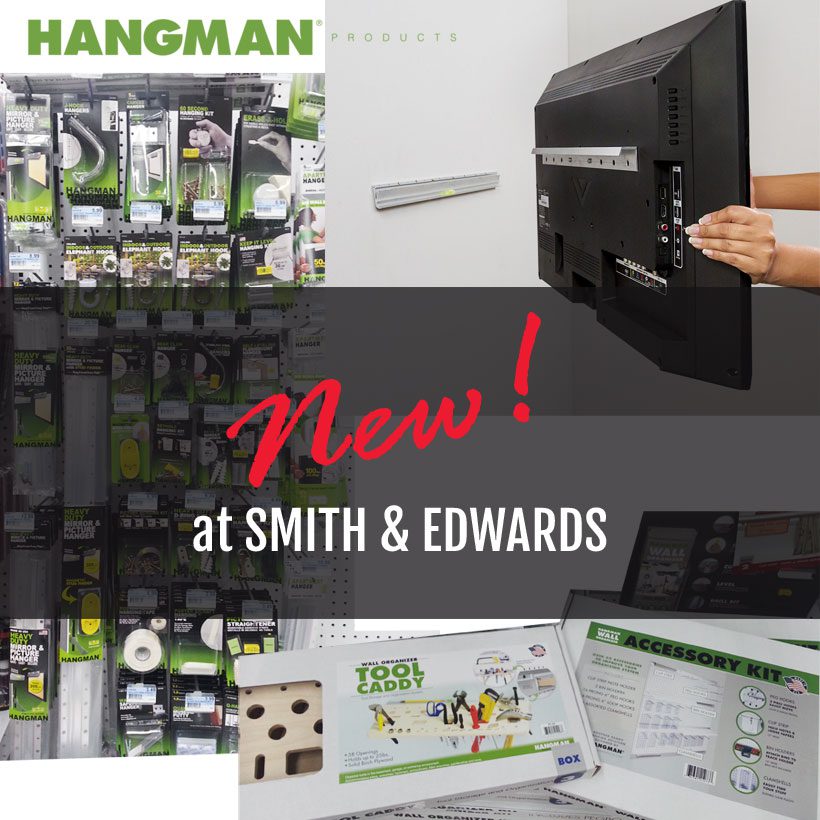
Check out the new line of Hangman Products at Smith & Edwards!

Brand Spotlight: Hangman Products

- posted by EmmaLee Sessions

Smith and Edwards is continuously growing and expanding in our business, and that includes working with new manufacturers and carrying new brands.

Recently, we have added Hangman® Products to our store! There are a few reasons for YOU to be as excited about these products as we are.

Hangman® Products make your Walls Happy!

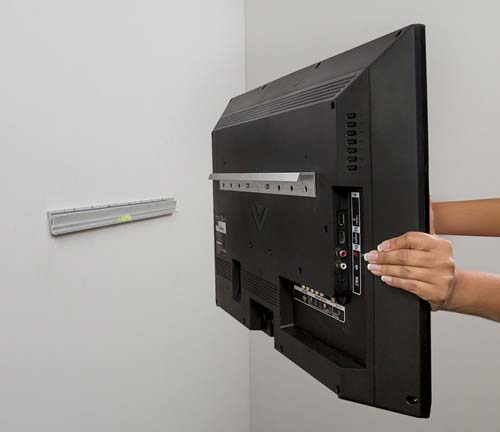
Hangman Products are perfect for hanging pictures and other wall art. Hangman also carries products to hang your electronic devices, such as the Wallsaver Speaker Hanging Kit and No Stud TV Hanger.

"<yoastmark

Hangman Speaker Mount Kit

Hangman TV Mount

Hangman TV Mount Kit

We know that you’ll love these Hangman products! With a motto of “Hanging solutions for everyday needs,” they are perfect for organized people. They can even help the unorganized person become organized, too!

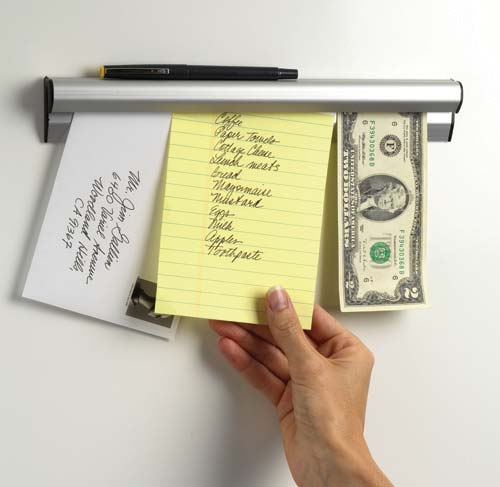
Hangman wall organizer

Hangman Wall Organizer

Where to get American Hangman Products

Hangman® Products is an American hardware company that makes most of their products right here in the USA. They are made with quality and care for their customers.

You’ll find Hangman® Products on aisle 40 by the Rope Room at Smith & Edwards off I-15 off exit 351 in Ogden, Utah, as well as right here on our website.

Check out Hangman Products, now at Smith & Edwards!

Check out Hangman® on Instagram and their Pinterest boards for even more inspiration!

How to make a Boa Paracord Bracelet (also called Trilobite Bracelet)

How to make a Boa Paracord Bracelet

- posted by Rose Marion

While I was walking past the Rope Room the other day, our Hardware buyer, Blaine Taylor, called me over. “I have a surprise for you,” he said.

Next thing I knew, I found myself in a dark sideroom looking at a bundle of paracord that glowed in the dark!

Just a short time under an LED flashlight was all it took to activate the PARAGLOW white and light blue paracord Blaine just got in. “Wow!” I thought. “This would be so cool to turn into a bracelet for hiking!”

I like having reflective gear, especially as it starts to turn fall, so if I’m walking near twilight the cars can still see me.

A glow in the dark paracord bracelet would be GREAT!

“That’s not all,” Blaine told me. “I’ve got another new paracord. This orange paracord has a jute strand, for starting a fire, AND it’s got an 8lb test fishing line inside.”

You can find reflective & glow-in-the-dark paracord online here, and at the Rope Room in-store at Smith & Edwards. This is some neat stuff!

Light Blue Glow-in-the-Dark 550 Feet White Glow-in-the-Dark 550 Paracord - 100 Feet Neon Orange Fish & Fire 550 Paracord - 100 Feet
Light Blue Glow-in-the-Dark 550 Paracord – 100 Feet White Glow-in-the-Dark 550 Paracord – 100 Feet Neon Orange Fish & Fire 550 Paracord – 100 Feet

And the bracelet? Jerica in the Web Department helped me make it. Well, I found the bracelet and she figured how to make it! This is a Trilobite bracelet, aka ladder rack or boa paracord bracelet. Here’s how she made it!

Making the Paracord Bracelet

You’ll need:

  • About 85″ each of 2 colors of 550 paracord (6″ wrist)
    If you want a single color bracelet, use 170″ and skip step 1.
  • 5/8″ buckle
  • Lighter
  • Scissors

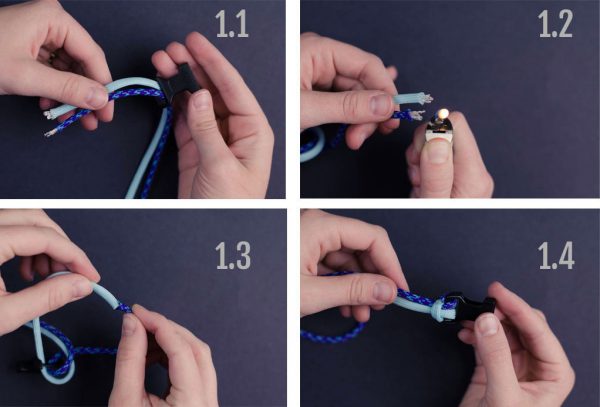
1. Thread the ends of your paracord into the receiving end of your buckle. Then, melt the ends together.

Make a lark’s head knot, hiding the seam of the thread so it doesn’t scratch your wrist.

Starting the boa weave bracelet

2. Put the paracord through the two openings in the other buckle. Measure the paracord around your wrist. Add 1/2″ and move the buckle to that point.

Measure the bracelet

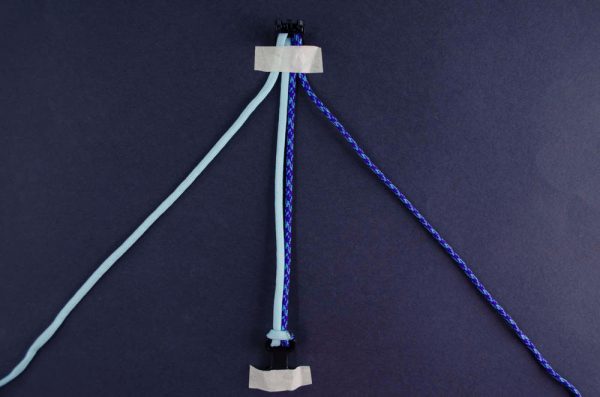
3. Tape the buckles to the table, with the 4 strand buckle at the top. You have 2 outer and 2 inner strands now.

Taping the bracelet to the table

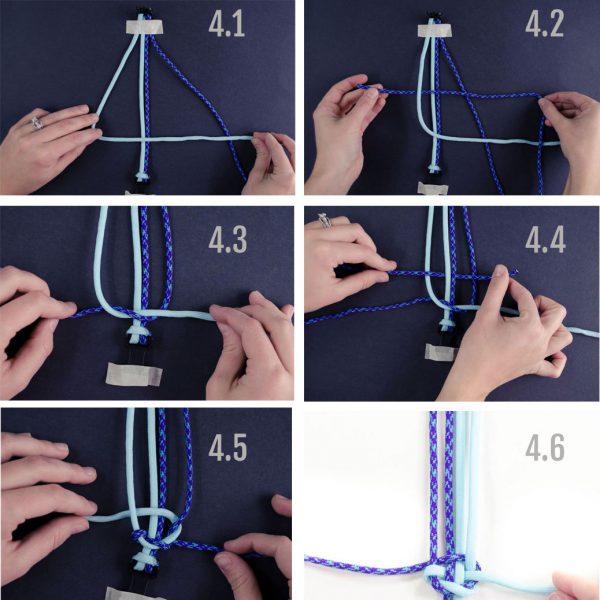
4. Make a 4 with the outer left strand, and hold it over all other strands. Bring the outer right strand over the 4 tail, over the inner strands, and under the 4. This will make a Granny knot over the bottom buckle.

Finishing the bracelet beginning knot

In the photo above, for the fourth picture, bring the strand you just wove with, over the outer left strand, under the inner strands, and over the outer right strand.

Then, take the outer right strand and weave it under the strand you just wove with, over the inner strands, and under the outer left strand.

Good job – you’ve finished the hardest part!

We made the bracelet twice, and flipped the colors the 2nd time. We apologize!

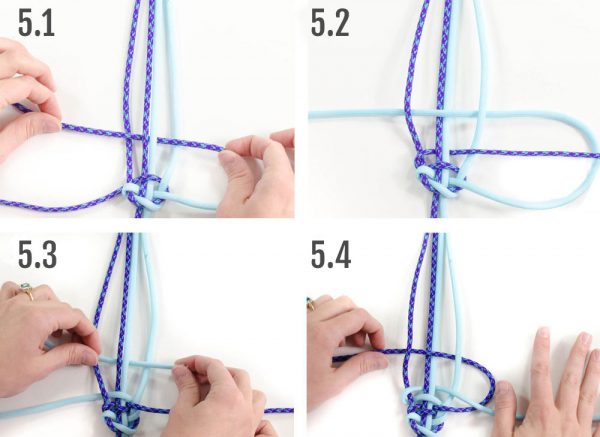
5. Now we’ll just weave to the top of the inner cords.

Weaving the Boa Bracelet

Take the left outer cord and weave it over the first inner cord, under the middle inner cords, and over the last inner cord.

Take the right outer cord and weave it under the last inner cord, over the middle inner cords, and under the first inner cord.

Repeat this process all the way up the bracelet!

6. Now and then, stop to adjust the snugness of the weave, so you can have a consistent & tight weave.

Finishing the Bracelet

Here’s how we finished the boa bracelet.

1. Push & tighten the weave. Then, loop the strands so that they are next to each other. Trim the paracord to be just long enough to grasp.

2. Take your lighter and melt the ends of the strands. Hold the ends together and press with flat nose pliers to seal them together.

Tip: Have a friend hold the lighter for you, so you can hold one strand in each hand, and melt them together!

Finished Boa or Trilobite Bracelet - that glows in the dark!

You’re done! Enjoy your bracelet!

Check out our HUGE collection of Paracord on SmithandEdwards.com

Want to make more Paracord Bracelets?

Looking for more Paracord Bracelet patterns? Here are some sites & channels we found that have GREAT tutorials!

Make your own DIY Bucket Washing Machine with Smith & Edwards - watch Melissa's video!

How to Make your own Laundry Bucket Washer (video)

- posted by Rose Marion

Muck-covered overalls? Horse leg wraps? Greasy shop rags? There’s no way those are going in the nice front-loading washing machine.

Here’s a neat way to turn 5-gallon buckets into a shop washing machine that keeps the mucky things out of the clothing laundry. We saw this on Pinterest and HAD to try it out!

Plus, you can also keep this on hand for emergencies: the Zombie Apocalypse or when the power goes out.

Thanks to Melissa in our Housewares department for showing us how to do it, and Marty for cleaning the leg boots!

Tip: Did you just buy a new pair of dark-wash denim jeans? Add a cup of vinegar and don’t add soap. Then, add your new jeans and let them sit overnight. This will help set the dye, and you won’t get as much indigo rub-off on the rest of your laundry!

Make your own DIY Laundry Bucket at Home

You’ll need these supplies:

Directions:

  1. Drill holes in one of the buckets, both the bottom and 1/3 to 1/2 of the way up the sides.
  2. Drill a hole in the lid with a 2″ hole saw. Then, insert the bushing.
  3. Now drill 1/2″ holes in the rubber plunger.
  4. You’re done!
NuvoH2O Systems

Salt Free Water Softener: Born in Utah!

- posted by Rose Marion

I love our water softener, but there’s one thing I can’t deal with: 40-pound salt bags. That’s what the honey-do list is for right?

Some folks don’t like soft water though. Getting out of the shower, maybe you get a slimey feeling still like the soap isn’t washed off still. Or maybe you don’t like the way it tastes.

NuvoH2O is a company based out of Kaysville, Utah that has a solution to make both of us happy! A salt-free water softener that doesn’t have the taste or feel of soft water – just all the benefits.

How NuvoH2O works

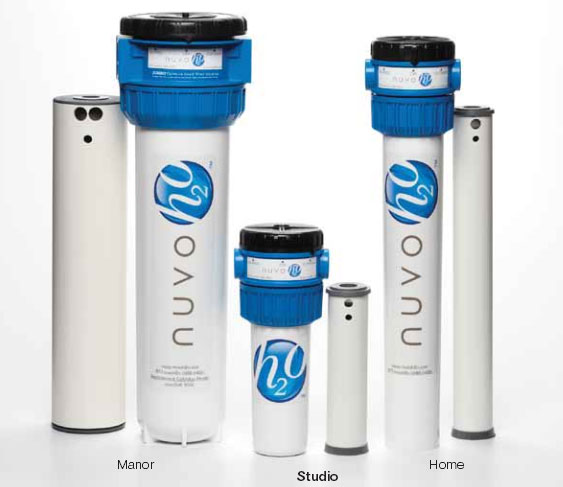
The NuvoH2O takes the place of water softening machines 3-4 times its size! Water runs through the unit, coursing through the citrus cartridge. The cartridge allows limescale and other chemicals to run through your pipes and appliances without any buildup or residue – it’ll even clean out the stalactites growing in your hot water heater if you’ve got an older home without a softener.

The citrus cartridges good for 6 months, and they’re even FDA-approved.

NuvoH2O Softener

NuvoH2O can hook right up to your existing pipes.

How to Install the Saltless Water Softener

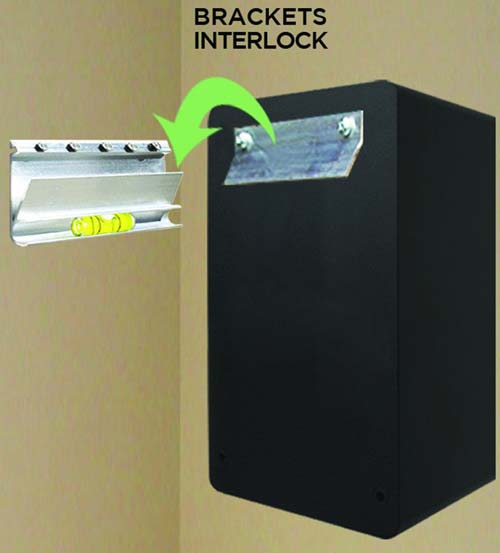
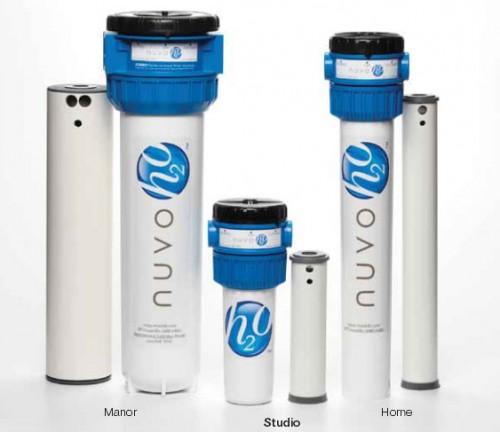
The NuvoH2O system is only a couple feet tall on the biggest model! So it can attach right to your wall instead of taking up more room by the water heater. A bracket and installation hardware come with the system so you can put it up without having to get more stuff.

If you already have a water softener, you don’t have to call the plumber to switch it out unless you really want to. We have all the parts you need to hook it up.

Here’s how to switch it:

  1. Turn off your main water line.
  2. Cut pipes that are connected to your old water softener.
  3. Remove old system.
  4. Connect new system in-line using shark-bite fittings.

If you need more help, Blaine Taylor our Plumbing & Hardware manager would be happy to help you out! Come in or give him a call at 801-731-1120.

Salt Free Water Softener

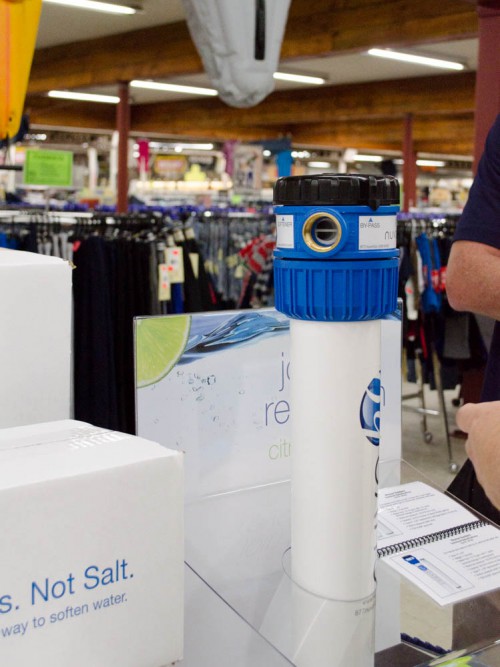
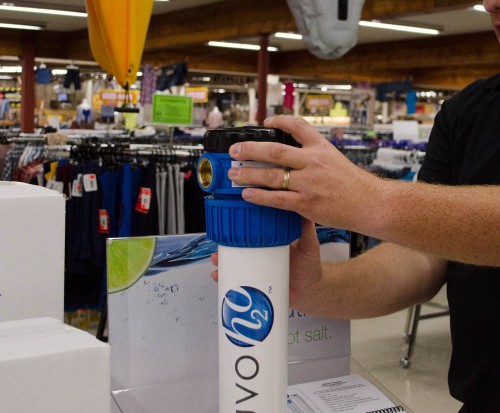
Check out how small this system is! This is the home edition Marcus has got his hand on.

To replace the cartridge, just unscrew the top, take out the old one, and pop the new one in. The cartridge is 37 pounds lighter than a bag of salt to dump in your typical water softener!

Nuvo Water softener

Where can you find one?

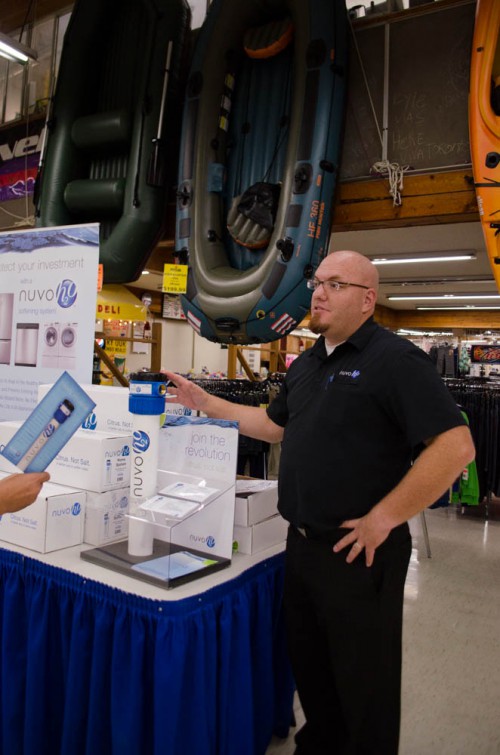
Smith & Edwards is one of only a handful of stores in Utah carrying the NuvoH2O system because it’s so new to the market!

Well, actually that’s half true. The fact is Nuvo’s technology has been around for 25 years in the commercial sector, softening water in businesses like restaurants. So it’s just now coming into homes and apartments.

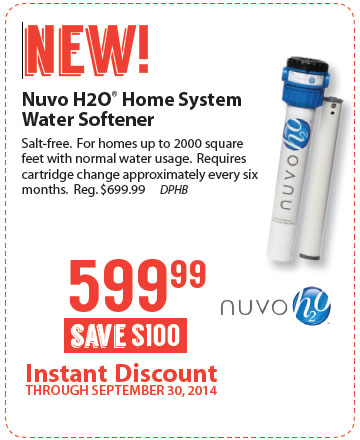
Smith & Edwards is a GREAT place to get your NuvoH2O, too, because not only do we have all the cartridges and plumbing fixtures you need (remember, you don’t need a plumber to hook it up!) …. we also have a $100 INSTANT REBATE through September 30 so you can get a new water softener system at a great savings. All right!

Check out the NuvoH2O & buy replacement cartridges online:

NuvoH2O Rebate

NuvoH2O Systems

Smith & Edwards Toy Sale event tips

3 Tips for a Victory at Smith and Edwards’ Toy Sale

- posted by Rose Marion

Smith and Edwards’ Toy Sale is a great event for getting gifts for Christmas! You’ll be sure your kids and grandkids will have a fun-filled Christmas morning with toys from our Toy Sale.

About the Toy Sale

The Smith and Edwards Toy Sale happens every fall. Like us on Facebook to see all our events and when they are scheduled. Promotional toys are at a fixed low price leading up to December!

We’ll publish our list of Toys available on our Current Specials page!

What kind of toys can you get? Top brands like Disney, Mattel, Fisher-Price, Hot Wheels, Littlest Pet Shop, and much, much more.

3 Tips for VICTORY at the Smith and Edwards Toy Sale

What do we mean by “victory”? Well, the top toys sell out fast, and you want to be sure and get the toys your kids will love. There’s nothing more satisfying than getting the toys your children want at a great price! You’ll walk out the doors with amazing toys and a huge smile on your face because you did so well at the Toy Sale.

Vickie, our Toys & Housewares buyer, offered some advice she’d give for first-timers hoping to have a great time at a Toy Sale. Hardware buyer Blaine offered tips, too – together they’ve watched thousands of excited, savvy shoppers run down the aisles of our Toy Sales, and they know how to make it a great experience.

1. Prepare – and be early! Watch for our toy lists so you can go straight to the toys you’re shopping for.

While we have thousands of toys at each Toy Sale, the most popular ones disappear fast, so if you want a specific toy from the toy list, plan ahead so you can head straight for it Monday morning without distractions.

Our doors open at 9am, but we’ve seen people lined up much, much earlier than that. Plan to be here early. You can even bring a chair and meet some new friends in line before the Toy Sale starts!

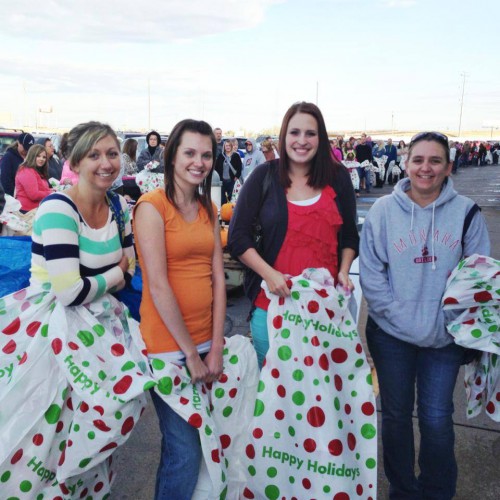
Our lucky winner and her friends, first in line at Smith and Edwards' Toy Sale!

Nitasha got to skip to the front of the line October 14 at our second Toy Sale in 2013. Congrats!

2. Shop Ahead! It feels amazing to get your Christmas shopping done early! Sure, you might be getting great deals on toys for the holidays. But these aren’t Christmas-only toys – I bet you can get great deals on toys they’ll love the whole year, for birthdays and more.

This is a great way to get name-brand toys for every boy and girl on your list – especially if your children have lots of cousins and friends. You’ll be prepared for Christmas and beyond with a little help from us at Smith & Edwards :)

And by the way – if it looks like we’re out of a certain toy, feel free to ask us for help. Oftentimes shoppers will take toys to the register, but they’ll only keep some of them. We’ll be running more toys back to the Toy Sale tables all morning to help you get the toys you want!

3. Come with your friends! Arrange for someone to watch the kids while you bring your friends to go Toy Sale shopping with you. Leave the kids at home, because you don’t want to worry about a stroller or collecting the kids when you check out (or them seeing their presents!). So having a girls-day-out-shopping will make the sale a big adventure. Not only is there safety in numbers – it’s a lot more fun, too!

You can combine your friends’ shopping lists with yours, or you can divide and conquer – you’ll have a ton of fun together, and you’ll all have a great experience to talk about afterward.

So get ready for lots of fun! Plan on coming and enjoying a morning of scoring great toys your kids will love. It’s really spectacular – you’ve gotta be here!

And while you might have heard scary rumors… our Toy Sales are typically pretty tame. Promise! It can get crowded, but everyone’s here to have a good time and get great toys for our kids, so you don’t need to bring knee pads or elbow pads. Just plan on a nice morning of great deals and great savings!

Got questions? Give us a call at 801-731-1120, we’ll be happy to help you get everything you need for a great Christmas.