While I was walking past the Rope Room the other day, our Hardware buyer, Blaine Taylor, called me over. “I have a surprise for you,” he said.
Next thing I knew, I found myself in a dark sideroom looking at a bundle of paracord that glowed in the dark!
Just a short time under an LED flashlight was all it took to activate the PARAGLOW white and light blue paracord Blaine just got in. “Wow!” I thought. “This would be so cool to turn into a bracelet for hiking!”
I like having reflective gear, especially as it starts to turn fall, so if I’m walking near twilight the cars can still see me.
A glow in the dark paracord bracelet would be GREAT!
“That’s not all,” Blaine told me. “I’ve got another new paracord. This orange paracord has a jute strand, for starting a fire, AND it’s got an 8lb test fishing line inside.”
You can find reflective & glow-in-the-dark paracord online here, and at the Rope Room in-store at Smith & Edwards. This is some neat stuff!
| Light Blue Glow-in-the-Dark 550 Paracord – 100 Feet | White Glow-in-the-Dark 550 Paracord – 100 Feet | Neon Orange Fish & Fire 550 Paracord – 100 Feet |
And the bracelet? Jerica in the Web Department helped me make it. Well, I found the bracelet and she figured how to make it! This is a Trilobite bracelet, aka ladder rack or boa paracord bracelet. Here’s how she made it!
Making the Paracord Bracelet
You’ll need:
- About 85″ each of 2 colors of 550 paracord (6″ wrist)
If you want a single color bracelet, use 170″ and skip step 1. - 5/8″ buckle
- Lighter
- Scissors
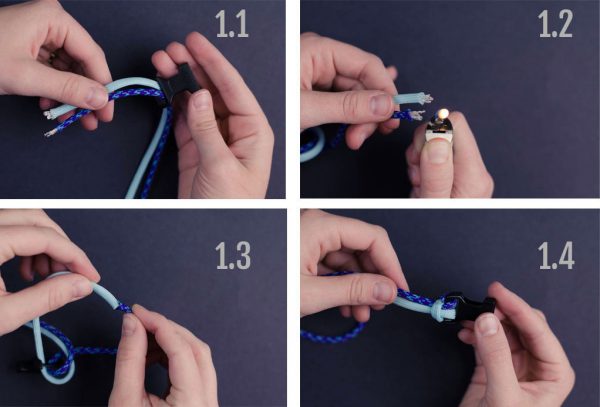
1. Thread the ends of your paracord into the receiving end of your buckle. Then, melt the ends together.
Make a lark’s head knot, hiding the seam of the thread so it doesn’t scratch your wrist.
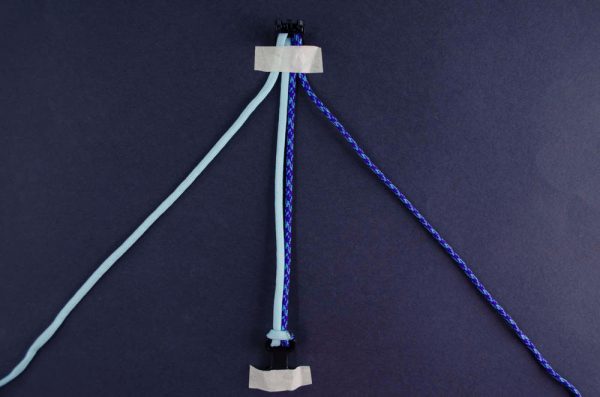
2. Put the paracord through the two openings in the other buckle. Measure the paracord around your wrist. Add 1/2″ and move the buckle to that point.
3. Tape the buckles to the table, with the 4 strand buckle at the top. You have 2 outer and 2 inner strands now.
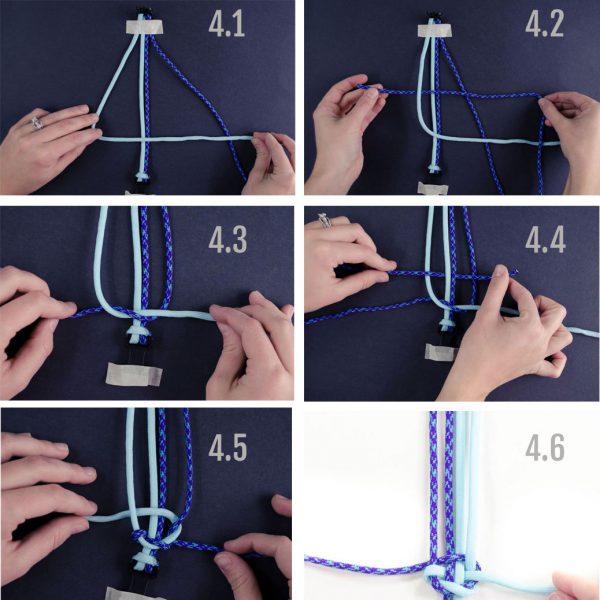
4. Make a 4 with the outer left strand, and hold it over all other strands. Bring the outer right strand over the 4 tail, over the inner strands, and under the 4. This will make a Granny knot over the bottom buckle.
In the photo above, for the fourth picture, bring the strand you just wove with, over the outer left strand, under the inner strands, and over the outer right strand.
Then, take the outer right strand and weave it under the strand you just wove with, over the inner strands, and under the outer left strand.
Good job – you’ve finished the hardest part!
We made the bracelet twice, and flipped the colors the 2nd time. We apologize!
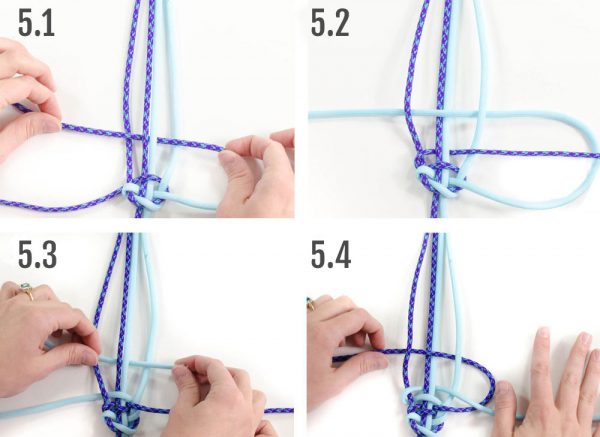
5. Now we’ll just weave to the top of the inner cords.
Take the left outer cord and weave it over the first inner cord, under the middle inner cords, and over the last inner cord.
Take the right outer cord and weave it under the last inner cord, over the middle inner cords, and under the first inner cord.
Repeat this process all the way up the bracelet!
6. Now and then, stop to adjust the snugness of the weave, so you can have a consistent & tight weave.
Finishing the Bracelet
Here’s how we finished the boa bracelet.
1. Push & tighten the weave. Then, loop the strands so that they are next to each other. Trim the paracord to be just long enough to grasp.
2. Take your lighter and melt the ends of the strands. Hold the ends together and press with flat nose pliers to seal them together.
Tip: Have a friend hold the lighter for you, so you can hold one strand in each hand, and melt them together!
You’re done! Enjoy your bracelet!
Want to make more Paracord Bracelets?
Looking for more Paracord Bracelet patterns? Here are some sites & channels we found that have GREAT tutorials!


