Tag Archives: video

Snap to Vent by Zigguraut

Check It Out: Snap-to-Vent Dryer Connectors

- posted by Jerica Parker

What is the most frustrating thing about installing your dryer? For me, it’s all the hoses and attachments, and then, getting them to fit in the laundry room without crushing them.

Even more frustrating is how awkward it is to try to lean over your dryer with the hose clamp and screwdriver to install or clean the ventilation hose.

Luckily for you, and for me, Ziggurat Products came up with a solution to our problem. Snap-to-Vent connectors make this job quick and easy!

How the Snap-to-Vent system Works

When pushing your dryer back against the wall, sometimes the hose can be crushed and this prevents necessary ventilation. Both Snap-to-Vent’s products

The best part about Ziggurat Products company is that it’s local, right here in Ogden, Utah! Check out the Snap-to-Vent 90-Degree and Snap-to-Vent Straight connections on SmithandEdwards.com.


If your Clothes Dryer vents straight to the duct: Straight Connector

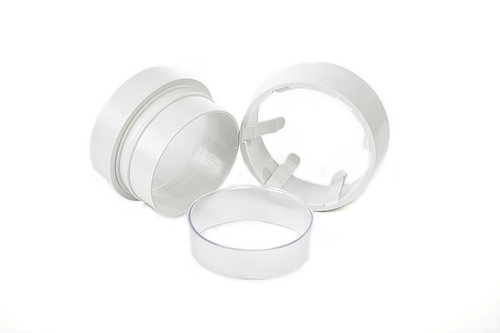
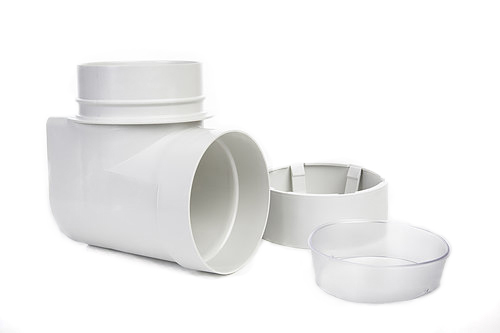
If your dryer duct and wall duct are relatively close together, you will want the Snap-to-Vent Straight design connector. This is an easy connection for installing your dryer, and if you ever need to take it back apart for maintenance or cleaning. Simply pre-connect Snap-to-Vent Straight before you go behind your dryer for installation. Place the snap connector over dryer hose with tines on the inside of the hose. Take the straight and place it so that the tines push against the hose holding the connector tight to the dryer hose. Take the seal ring and either put it around the duct or in the straight and press into the duct until it creates an air tight seal. Easy enough!

If your Clothes Dryer hose has to vent on another wall, use the 90° Elbow

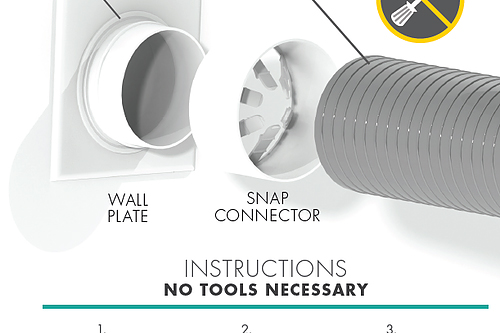
The Snap-to-Vent 90-degree Elbow connection helps to avoid smashing your hose by connecting the hose at a 90-degree angle to your dryer. It comes with easy instructions: Pre-assemble the hose to the snap connector and the snap connector into the 90-degree elbow and snap together. Take the seal ring and pre install onto dryer or wall duct and press the 90 elbow into the dryer duct or wall duct. And voila! The elbow connector can push right up against the wall and still keep your hose protected and working how it should.


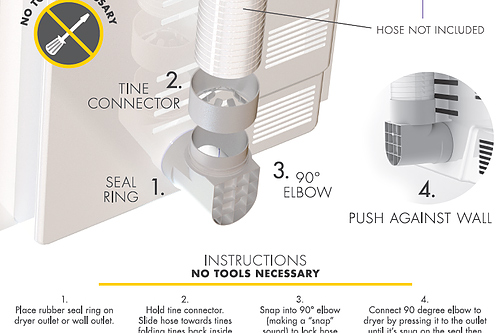
Having a clean and clear vent reduces the risk of fires and improves the efficiency of your dryer. With no tools necessary and less time and confusion during installation, how could you not love Snap-to-Vent!

How to tie a Double Diamond Knot

How to tie a Double Diamond Knot and Horse Packing Q&A

- posted by Rose Marion

We were privileged to have Travis Sparks come by and do a packing demo the other day. Hunting is a totally different experience with horses. One hunter told me his story about finally getting his deer right at the end of the day, and was dreading the hike back uphill to the truck. Luckily some horse packers saw him, came down, and helped him quarter & pack out the deer. He would have been out there way past sunset without their help!

Packing isn’t just about packing out quarters. Your mule or horse might have tent poles, a shovel, lawn chairs, your bedroll, coolers, cooking supplies, or feed on his back. When you throw in antlers into the mix, packing turns into a real art & skill developed through practice.

Travis is a member of the Back Country Horsemen of Utah & does a lot of packing himself. He gave us a detailed demonstration of the Double Diamond hitch, and answered several questions about packing.

Watch Horse Packing Tips & Knot How-To

I split Travis’s presentation into two videos for you. First, you can see exactly how to do the Double Diamond knot on our trusted cavalry horse. This is a great hitch for top packing. Then, sit back and listen to Travis’s question & answer session about packing elk antlers, using a pack scale to balance your load, using soft packs vs hard packs, and tightening a cinch.

Packing with a Double Diamond knot

Packing with a Double Diamond knot. Thanks to Troy Higgs for this picture!

Watch: How to tie a Double Diamond Knot

Use a 45-foot rope to make this hitch, which starts out similar to the box hitch. Make sure and pull the rope tight.

Watch: Horse Packing for Hunting Q&A

Where to get those Pack Bags

Smith & Edwards pack bags for hunting on horseback

We make the pack bags shown in Travis’s demo, these are the #663 designed for coolers. We also make a narrower bag without flaps, #1665, and #1666 with flaps.

Of course I’ve got to mention that we proudly make those bearcloth packs you saw in the video, and you can get them right here on our online store. Click here to read about our Tack Workshop.

Do you have questions about horse packing that Marty or Travis can answer for you? Let us know in the comments below!

Travis’s Tips for Packing

  • Check your cinch after moving your animal – always make sure it’s tight!
  • Your goal is to make everything into a single package that moves together, without a pivot point
  • Keep your horse safe from antlers: make sure the rack moves along with the pack bags. Try not using a stick or a branch to elevate the horns, because they don’t ride well.
  • Keep the center of gravity low
  • Keep in mind what will hit a branch first: your pack bags or antlers?
  • Don’t take shortcuts, don’t get in a hurry – pack it right.
  • Rule of thumb, pack 15% of an animal’s weight. So for a 1000 pound animal, aim for 150-160 pounds split over the two sides.
How to make a Boa Paracord Bracelet (also called Trilobite Bracelet)

How to make a Boa Paracord Bracelet

- posted by Rose Marion

While I was walking past the Rope Room the other day, our Hardware buyer, Blaine Taylor, called me over. “I have a surprise for you,” he said.

Next thing I knew, I found myself in a dark sideroom looking at a bundle of paracord that glowed in the dark!

Just a short time under an LED flashlight was all it took to activate the PARAGLOW white and light blue paracord Blaine just got in. “Wow!” I thought. “This would be so cool to turn into a bracelet for hiking!”

I like having reflective gear, especially as it starts to turn fall, so if I’m walking near twilight the cars can still see me.

A glow in the dark paracord bracelet would be GREAT!

“That’s not all,” Blaine told me. “I’ve got another new paracord. This orange paracord has a jute strand, for starting a fire, AND it’s got an 8lb test fishing line inside.”


You can find reflective & glow-in-the-dark paracord online here, and at the Rope Room in-store at Smith & Edwards. This is some neat stuff!

Light Blue Glow-in-the-Dark 550 Feet
Light Blue Glow-in-the-Dark 550 Paracord – 100 Feet
White Glow-in-the-Dark 550 Paracord - 100 Feet
White Glow-in-the-Dark 550 Paracord – 100 Feet
Neon Orange Fish & Fire 550 Paracord - 100 Feet
Neon Orange Fish & Fire 550 Paracord – 100 Feet

And the bracelet? Jerica in the Web Department helped me make it. Well, I found the bracelet and she figured how to make it! This is a Trilobite bracelet, aka ladder rack or boa paracord bracelet. Here’s how she made it!

Making the Paracord Bracelet

You’ll need:

  • About 85″ each of 2 colors of 550 paracord (6″ wrist)
    If you want a single color bracelet, use 170″ and skip step 1.
  • 5/8″ buckle
  • Lighter
  • Scissors

1. Thread the ends of your paracord into the receiving end of your buckle. Then, melt the ends together.

Make a lark’s head knot, hiding the seam of the thread so it doesn’t scratch your wrist.
Starting the boa weave bracelet
2. Put the paracord through the two openings in the other buckle. Measure the paracord around your wrist. Add 1/2″ and move the buckle to that point.
Measure the bracelet

3. Tape the buckles to the table, with the 4 strand buckle at the top. You have 2 outer and 2 inner strands now.
Taping the bracelet to the table

4. Make a 4 with the outer left strand, and hold it over all other strands. Bring the outer right strand over the 4 tail, over the inner strands, and under the 4. This will make a Granny knot over the bottom buckle.
Finishing the bracelet beginning knot

In the photo above, for the fourth picture, bring the strand you just wove with, over the outer left strand, under the inner strands, and over the outer right strand.
Then, take the outer right strand and weave it under the strand you just wove with, over the inner strands, and under the outer left strand.

Good job – you’ve finished the hardest part!

We made the bracelet twice, and flipped the colors the 2nd time. We apologize!

5. Now we’ll just weave to the top of the inner cords.
Weaving the Boa Bracelet

Take the left outer cord and weave it over the first inner cord, under the middle inner cords, and over the last inner cord.

Take the right outer cord and weave it under the last inner cord, over the middle inner cords, and under the first inner cord.

Repeat this process all the way up the bracelet!

6. Now and then, stop to adjust the snugness of the weave, so you can have a consistent & tight weave.

Finishing the Bracelet

Here’s how we finished the boa bracelet.

1. Push & tighten the weave. Then, loop the strands so that they are next to each other. Trim the paracord to be just long enough to grasp.
2. Take your lighter and melt the ends of the strands. Hold the ends together and press with flat nose pliers to seal them together.
Tip: Have a friend hold the lighter for you, so you can hold one strand in each hand, and melt them together!

Finished Boa or Trilobite Bracelet - that glows in the dark!

You’re done! Enjoy your bracelet!

Click here to check out our HUGE collection of Paracord!

Want to make more Paracord Bracelets?

Looking for more Paracord Bracelet patterns? Here are some sites & channels we found that have GREAT tutorials!


How to jump start a Forklift, your car, and other things with this battery jump starter

Use this Battery Jump Starter to start ANY Vehicle

- posted by Rose Marion

This little battery can jump start your snowmobile, ATV, SUV, truck… even your FORKLIFT if you have one!

REALLY! We’ve given several demonstrations of jump-starting trucks and cars with the Conversions Technology Power on Demand X-5 and its predecessor, the POD X-4.

Randy got it in his head that we could start a forklift with it, and sure enough…. he did! Take a look:


This jump starter comes in its own case that’s smaller than a laptop bag. It doubles as an LED flashlight and power supply, too: you can power your smart phone, laptop, iPod, and more off it.

To charge it, I left mine plugged in overnight, which was more than enough time. You can also charge it in your car’s cigarette lighter.

These batteries make a GREAT gift for your loved one heading off to college or building their emergency preparedness items. I carry mine everywhere in my trunk (along with my paracord and Frisbee… my definition of preparedness is a little different!)

Click here to get YOUR POD x-5 from Power On Demand – and they’re on Aisle 8 in our Automotive department at Smith & Edwards.

Make your own DIY Bucket Washing Machine with Smith & Edwards - watch Melissa's video!

How to Make your own Laundry Bucket Washer (video)

- posted by Rose Marion

Pig muck-covered overalls? Horse leg wraps? Greasy shop rags? There’s no way those are going in the nice front-loading washing machine.

Here’s a neat way to turn 5-gallon buckets into a shop washing machine that keeps the mucky things out of the clothing laundry. We saw this on Pinterest and HAD to try it out!

Plus, you can also keep this on hand for emergencies: the Zombie Apocalypse or when the power goes out.

Thanks to Melissa in our Housewares department for showing us how to do it, and Marty for cleaning the leg boots!

Tip: Did you just buy a new pair of dark-wash denim jeans? Add a cup of vinegar and don’t add soap. Then, add your new jeans and let them sit overnight. This will help set the dye, and you won’t get as much indigo rub-off on the rest of your laundry!

Make your own DIY Laundry Bucket at Home

You’ll need these supplies:

Directions:

  1. Drill holes in one of the buckets, both the bottom and 1/3 to 1/2 of the way up the sides.
  2. Drill a hole in the lid with a 2″ hole saw. Then, insert the bushing.
  3. Now drill 1/2″ holes in the rubber plunger.
    You’re done!

WAKE THE BAY: Your April Willard Bay Fishing Report

- posted by Chris Jacobson

#WAKETHEBAY

Willard Bay is roaring awake for 2016! We are super excited to get this fishing season underway and I think Willard Bay isn’t going to disappoint this year. Check out this quick video we put together because we couldn’t wait to get out there!

FISHING REPORT

They raised the dike last year like some of you know, and early indications are that it is going to be an adequate watershed year. Hopefully that translates to a longer fishing season and more water in the bay.

To celebrate what should be an awesome year, we want to know how you #wakethebay! By that I mean, I want to see all of your Facebook and Instagram shots of you out on Willard Bay chasing the wiper, walleye, or whatever finned friend you like to chase.

Wayne Russell wakes the bay with kids & wipers!

Wayne Russell wakes the bay with kids & wipers!

Also, we have some killer deals in the Smith & Edwards Fishing department starting Saturday, April 9th and running for two weeks. Check them out online or watch your local newspaper for the ad coming Sunday, April 10th!

Willard Bay and Willard Peak - photo by Curtis CarterI had the opportunity to go out yesterday and go fishing on the bay. Let’s just say, I was a little nervous at first. We fished for 3-4 hours without much more than one fast strike and done. We didn’t even have time to get the rod out of the holder.

We kept at it though, and finally around 6pm we got into the wiper. We even hooked into a couple big crappie. I left my scale at home but they were almost the size of a dinner plate!

Wiper at Willard Bay - Curtis CarterWe were trolling a few different colors and patterns to try to figure out what they wanted. The hot color for the day was Fire Tiger. I think that had to do with the water being so murky. The bright colors showed up a lot better than some of the others.

The action was fast once we found the fish. They seemed to be in 14-18 feet of water. Although, the most active fish were in the top of the water column. The water temp was fluctuating between 56 and 60 degrees. Perfect to get the fish to be a little more active then they have been. My trip started out slow, but by the end of the day we caught close to a dozen fish and had a blast. Even got a little sunburnt!

Sunset at Willard Bay - photo by Curtis Carter

Looking ahead to what the month of April could bring, we should see the crappie fishing picking up with them coming in close to spawn in the next few weeks. The walleye spawn is all but over now and given a few weeks to recuperate, we should see them being caught in better numbers as well.

All of the fishing hinges on what the weather does. It looks like it should stay relatively warm, except for a few days of temps in the 50s. That should mean the water temp should stay up and fishing should be good and getting better going forward.

Look for the Fire Tiger colors to stay really hot. Especially if the water stays really murky. Other good colors are going to be the old standbys. The silver and blue or silver and black cranks and the gizzard shad cranks will produce fish. Especially as the new shad for this year get bigger.

These next couple of months are the best fishing on Willard and I hope y’all get out and enjoy the sun and fun.

GET YOUR GEAR

Click to shop fishing gear at Smith & Edwards!
Click to shop fishing gear online with Smith & Edwards… and get EVEN MORE gear in the store, just off Exit 351. Visit us on your way to the south marina of Willard Bay!

SEE THE WAKE THE BAY AD

Wake the Bay sale 2016 - page 1

Wake the Bay sale 2016 - page 2

Wake the Bay sale 2016 - page 3

Wake the Bay sale 2016 - page 4
The WAKE THE BAY Sale runs April 9-23, 2016. Show us on Facebook and Instagram how YOU #WAKETHEBAY!

Thanks to Curtis Carter for the stunning photos!

Tips on team roping from our Dummy Ropin' champions!

How to Rope (Video): Team Ropin’ Tips

- posted by Rose Marion

Kwade Kosoff and Pace & Wells Thompson stayed after the 2nd Annual Dummy Ropin’ here at Smith & Edwards to show us some dummy ropin’ runs and give tips on how to head & heel rope.

Head & Heel Ropin’ Tips from Kwade & Kyle Kosoff


Dummy ropin’ is a ton of fun, whether you’re a team roper or a backyard roper. Kyle provided commentary on tips & what to watch for.

dummy-ropin-kyle-kwade-kosoff
dummy-ropin-kyle-kwade-kosoff (1)
Start practicing after school or work and you’ll be a pro roper in no time. Then you can come show us your stuff in our next dummy ropin’ tournament!

These champions walked away with a Classic rope bag from Equibrand. Thanks to Equibrand, Cactus Ropes, & Lonestar Ropes for providing ropes & prizes!

Dummy Ropin' first round winners!

Pace and Braxton, Round I dummy ropin’ winners!

Dummy Ropin' second round winners

Cinch and Stone, Round II winners!

What you need to know to Start Ropin’

Roping Terms & What they Mean

Spoke:
The amount of rope in your loop from the honda to your grip on the rope.
Slack:
The loose part of the rope. You have to pull the slack to pull the rope tight.
Dally:
Securing the rope to your saddlehorn, in Team Roping when riding a horse. If you’re not on a horse, still practice pulling your slack and pulling your hands up!
Tip:
Part of the loop, the point of the rope, furthest away from your hand.
Heading:
One player catching the calf dummy around the horns or the neck. Kyle’s Tip: Aim at the left horn when you rope the head.
Heeling:
The second player catching the calf dummy around the rear ankles. Kyle’s Tip: Aim at the left hock (ankle).
Honda:
The bit of rope that loops & knots to allow for a loop in your rope. Click here to learn how to tie a honda from Tom. Click here to see Marty show how to put on a plastic speedburner.
Lay:
How stiff or soft your rope is. Heelers want a stiffer rope that will hold open longer (to get under the hooves). Heading ropes are softer.

How we Dummy Rope at Smith & Edwards – & you can in your backyard!

You need 3 people: a header, a heeler, and someone to push the dummy.

The header checks in with his heeler, and nods to the person pushing the dummy when he’s ready.

The header runs after the dummy and catches the horns or neck. Then, the header pulls the dummy straight, to the left, giving the heeler a good opportunity to get the rope under and around the dummy’s back legs. Pull the rope tight (dally the slack), and you’ve got it!

How to Score

We timed each run, from the moment the dummy moves forward, with a stopwatch. We stop the timer when the dummy is both headed & heeled.

It has to be a legal head catch: both horns, half a head (1 horn), or around the neck. We added a 5 second penalty if only caught one heel.

Come Give it a Try!

Ready to rope, too? Come in to our Western department and pick up your rope & dallies. Or, click over to Shop for Roping Supplies on our website. We’ll get you what you need!

Check out Roping gear on our website!

Don't Get her a Gun for Valentine's Day! Relationship tips from Smith & Edwards

Valentine’s Day Advice (Video)

- posted by Rose Marion

The guys of the Gun Counter at Smith & Edwards really have seen it all.

We’ve seen husbands and boyfriends who think they’re getting her the perfect gift… but it doesn’t go quite as planned.
Trust us – we KNOW how it goes!

Bonus Tip from one of our Fans

“My rule for Valentine’s is to buy a gift that you won’t mind being thrown at the back of your head. Appliance-bad. Flowers-not so bad.” – posted on our Facebook page

…Thanks for the tip!

Key Takeaway

If she WANTS a gun, get her one, by all means! Get her the one she’s been eyeing!

But if you have any doubt…. Don’t get her a gun for Valentine’s Day!
Play it safe with one of these woman-approved gifts:

Candles
Get her Candles!
Tip: “Romance”-scented candles are 25% off in February!
Wind Chimes
Wind Chimes
Bird Feeder
Get her a bird feeder so she can watch beautiful birds all summer!
Get your girlfriend a cuddly Beanie Boo stuffed animal!
Get your girlfriend a cuddly stuffed animal!
Baking goodies & kitchen gadgets
She'll love something new to bake with!
Cowboy Boots like in our Valentine’s Day outfit!
Get her Ladies' cowboy boots

Let me know what you think!

Do you agree with this video? Do you have different advice? Let me know in the comments below!

And do YOU have a video request for Smith & Edwards? Do you need relationship advice, fashion advice, or help with a project? Leave a comment for what you want to see in our next video! :)

Nothing beats a day spent duck hunting with your dog

What you need for Waterfowl in Utah

- posted by Rose Marion

Smith & Edwards is lucky to be right next door to Willard Bay, so we get to hear fishing reports from all types of anglers.

Even more than that, we’re just a couple miles from the Harold Crane Waterfowl Management Area, right behind Willard Bay, which is a great spot for ducks: you can bring a boat or even walk right in.

I got to head out an afternoon with Tyler from the Smith & Edwards gun counter, and his dog Roger, who’s a rambunctious ball of energy, still in training.

Duck hunting’s a popular sport among Smith & Edwards employees and friends. I wanted to see what it would take to get started!

Tyler’s Waterfowl Gear Picks

Here’s what Tyler recommends…

Waterfowl camo Smith & Edwards hat

Wear your Smith & Edwards hat for good luck!

Duck hunting camo: Most duck hunters choose Realtree Max-4, Max-5, or MossyOak Shadow Grass Blades patterns. Stay cozy: a good hoodie or jacket is going to keep you good & warm.

Tyler’s rockin’ the Smith & Edwards camo ball cap, too!

A shell belt will keep your ammunition close at hand!

Hunting Waders: The higher the number, the warmer! You can use ankle wraps to keep your jeans from sliding up when you put the waders on.

To take waders off, peel them down your legs!

Duck Calls: Our favorites here at the store are Zink, Primos, and Duck Commander. You can see a selection here, or come into the store and take a peek.

Get some paracord to make yourself a lanyard for your calls!

Shotgun & Shells: Don’t go cheap. You didn’t get all the way out here just to miss! You want a good knock-down Tyler likes the Estate, Hevi-Metal, Fasteel, and Winchester Blind Side shells.

This good-looking gun is a Browning A5 shotgun.

Decoys: Tyler likes the Tanglefree EZ Rig Decoy System, which has also been one of our top sellers this year! It’s such an easy system to use, and like you saw in the video, you can just hook the decoy lines to a carabiner and walk around placing or gathering the decoys.

Roger helping Tyler set up the decoys

The Tanglefree EZ Rig system is easy to manage and set up.

Decoy Gloves: We’ve carried Glacier Glove Decoy Gloves for years and they’re great: the neoprene keeps you warm and dry, they’re super flexible, and have grippy sharkskin-textured fingers & palms. These particular ones are Max-5 camo.

Blind Bag: We like Tanglefree and Wildfowler brands. Keep all your shells and gear together without having to worry.

Dog Supplies: We’ve sold out of the Tanglefree dog vests for the season, but we’ll have more coming for next year! We also carry the DT Dog Training systems here in the store, so if you’re looking to have a bird dog next season, you can start training him now.

Roger loves his duck toy, too!

Duck Hunting gear: shells, bind bag, and dog toy!

We’ve got decoy gloves, a blind bag, plenty of shells, and of course Roger’s squeaky duck toy!

Remember, you’ll need a duck stamp, too. When we were out filming we ran into a DNR agent. Be ready!

Get your own duck hunting gear at season-closeout prices:

Here are 3 great deals for the end of duck hunting season – this online special expires Sunday, Dec. 13th!

Tanglefree Ankle Wraps
Was: $5.99
Sale price: $3.99
Tanglefree Ankle Wraps
Tanglefree 37×39″ Mesh Decoy Bag
Was: $19.99
Sale price: 13.99
Mesh Decoy Bag
Tanglefree 29×38″ Mesh Decoy Bag
Was: $9.99
Sale price: 6.99
Mesh Decoy Bag

Had a good duck season? Send us your pictures to help (at) smithandedwards.com, we want to see ’em!